State and Backends
State
Pulumi stores its own copy of the current state of your infrastructure. This is often simply called state, and is stored in transactional snapshots we call checkpoints. A checkpoint is recorded by Pulumi at various points so that it can operate reliably—whether that means diffing goal state versus current state during an update, recovering from failure, or destroying resources accurately to clean up afterwards. Because state is critical to how Pulumi operates, we’ll cover a few of the state backend options on this page.
Backends
Pulumi supports multiple backends for storing your infrastructure state:
- The Pulumi Service backend
- A self-managed backend, either stored locally on your filesystem or remotely using a cloud storage service
Pulumi Service backend
The Pulumi Service backend requires no additional configuration after installing the CLI. By default, the CLI uses the Service backend hosted at app.pulumi.com.
Pulumi offers this backend as a free service with advanced tiers for team and enterprise features. Using the Pulumi Service backend and the CLI together provides a great combination of usability, safety, and security for most users.
However, if you would prefer to manage this yourself, you can do so by opting into the filesystem or cloud storage backend.
Self-managed backend
To use the filesystem or local option,
run pulumi login --local so Pulumi stores your checkpoint files locally
on your machine. The default directory for these JSON files is
~/.pulumi.
To use the cloud storage or remote option, run
pulumi login --cloud-url <your-cloud-storage-url> so Pulumi stores
your checkpoint files at your specified URL
for your cloud storage object, also in a .pulumi directory. For
example,
https://s3.console.aws.amazon.com/s3/buckets/<my-pulumi-state-bucket>/.pulumi
where <my-pulumi-state-bucket> is the name
of your S3 bucket.
Visit the following links for details on cloud provider CLI and storage setup:
- AWS S3. See AWS Setup and Working with Amazon S3 buckets. See AWS Session for configuring credentials for this backend.
- Azure Blob. See Azure Setup
and Microsoft’s Storage Blobs Quickstart. This backend requires setting the environment variables
AZURE_STORAGE_ACCOUNTand eitherAZURE_STORAGE_KEYorAZURE_STORAGE_SAS_TOKEN. - Google Cloud Storage. See GCP Setup and Google’s Cloud Storage Quickstarts. See Application Default Credentials for configuring credentials for this backend.
Pulumi Service backend features
At a glance, the Pulumi Service backend provides the following benefits:
- Secure checkpoint storage, with client-side authentication to your cloud provider
- Encrypted state in transit and at rest
- Full deployment history for auditing and rollback purposes
- Concurrent state locking to prevent corrupting your infrastructure state in a team environment
- Advanced policy and RBAC (Role Based Access Control)
app.pulumi.com architecture
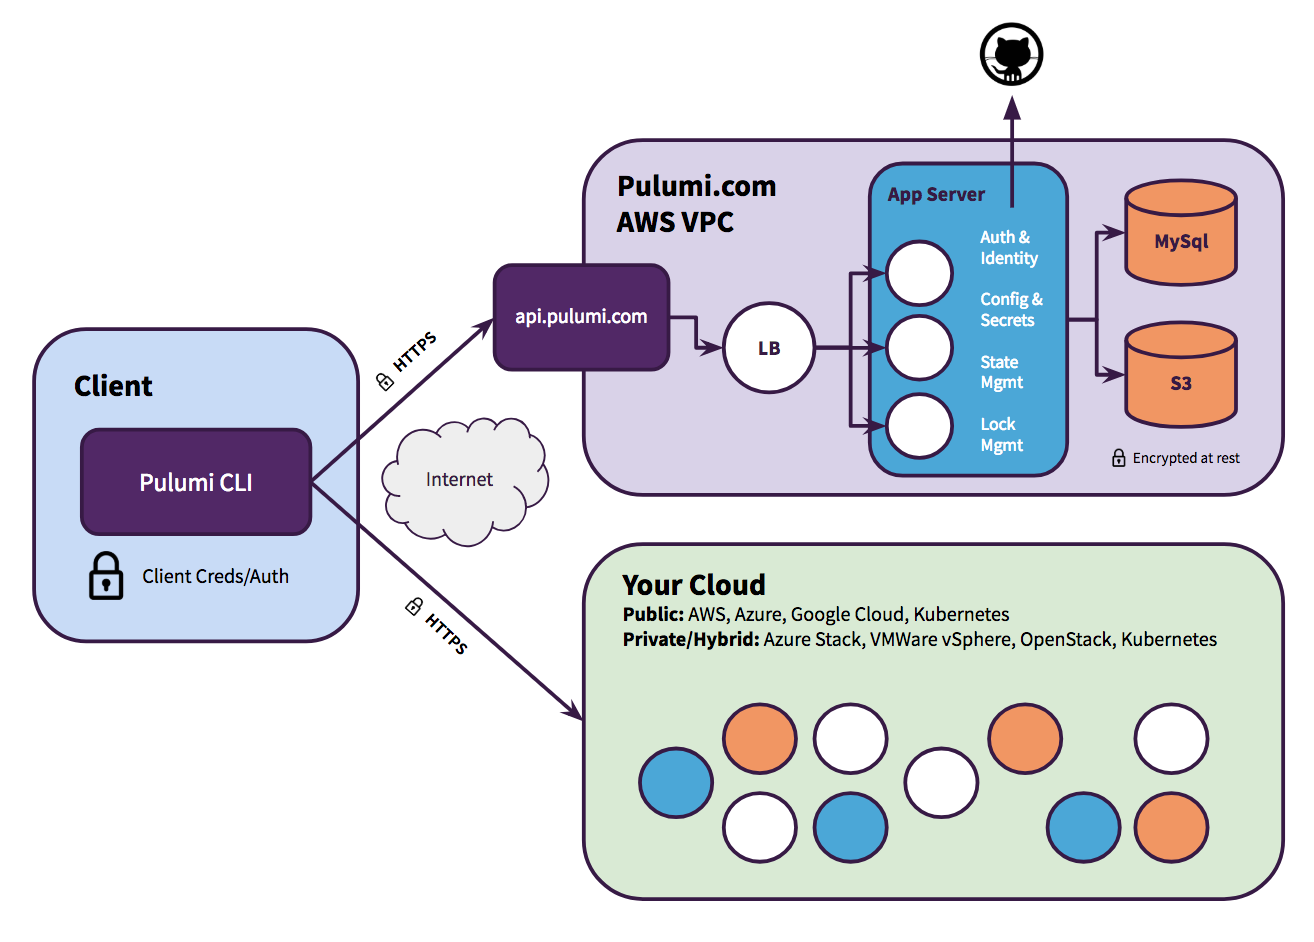
Enterprise web architecture
Pulumi enterprise users have a self-hosting option, for using the Pulumi Service backend features without depending on
app.pulumi.com.
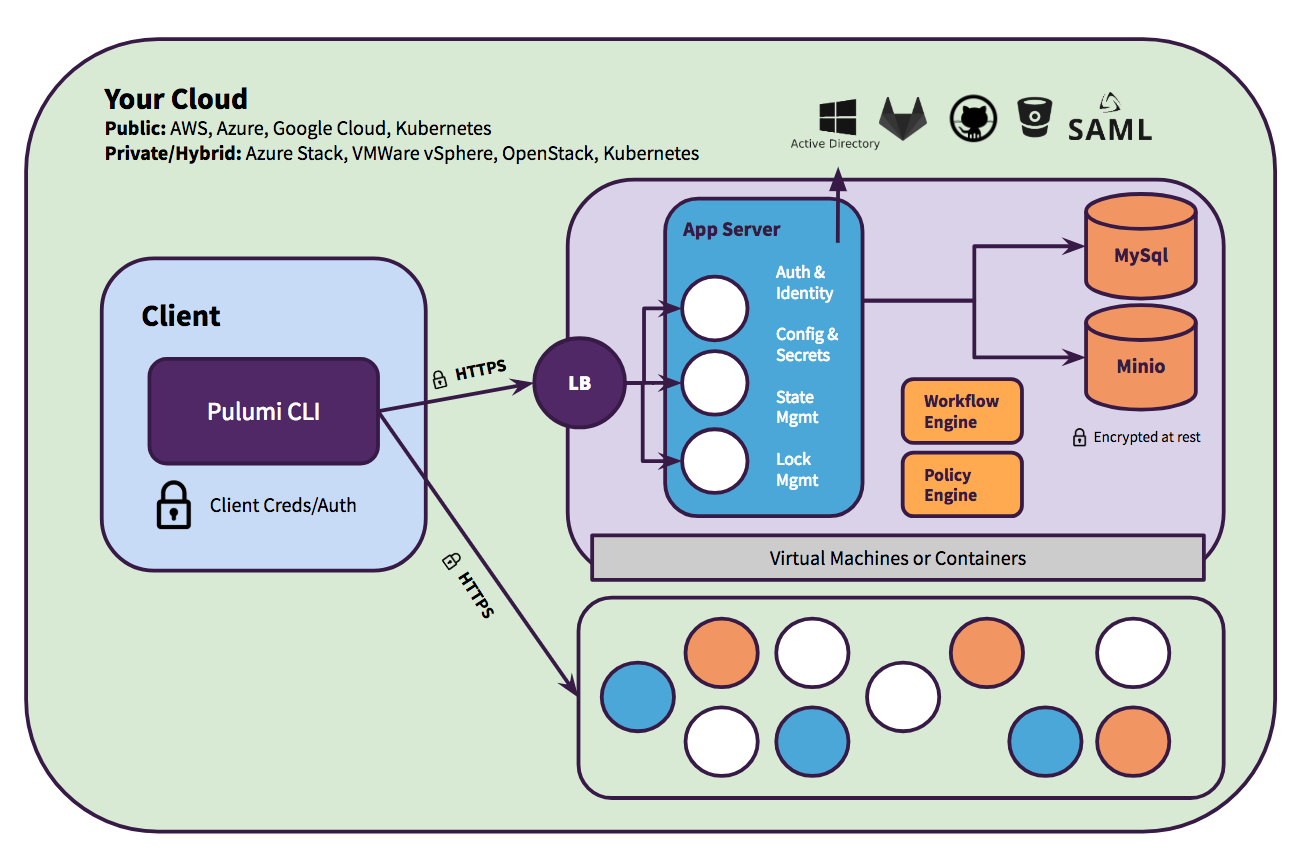
Contact us for more information on Pulumi Enterprise.
Logging in
The pulumi login CLI command lets you log in to a backend. By default,
you will be prompted to log in anytime you try to do something that requires stacks or state.
Backend info check
To quickly check your backend login info, run pulumi whoami with the v or verbose flag.
$ pulumi whoami -vSee pulumi whoami for more details.
Example response
User: <your-username>
Backend URL: https://app.pulumi.com/<your-username>
To the Pulumi Service backend
The Pulumi Service backend login process involves using access tokens.
$ pulumi loginThe prompt looks like the following:
Manage your Pulumi stacks by logging in.  Run `pulumi
login --help` for alternative login options.  Enter your access token from
https://app.pulumi.com/account/tokens or hit <ENTER> to log in using your
browser            :
If you hit <ENTER> as instructed, a web browser should pop up, and will
interact with the service to generate a new access token. If this is your first
time using the service, you will need to authenticate.
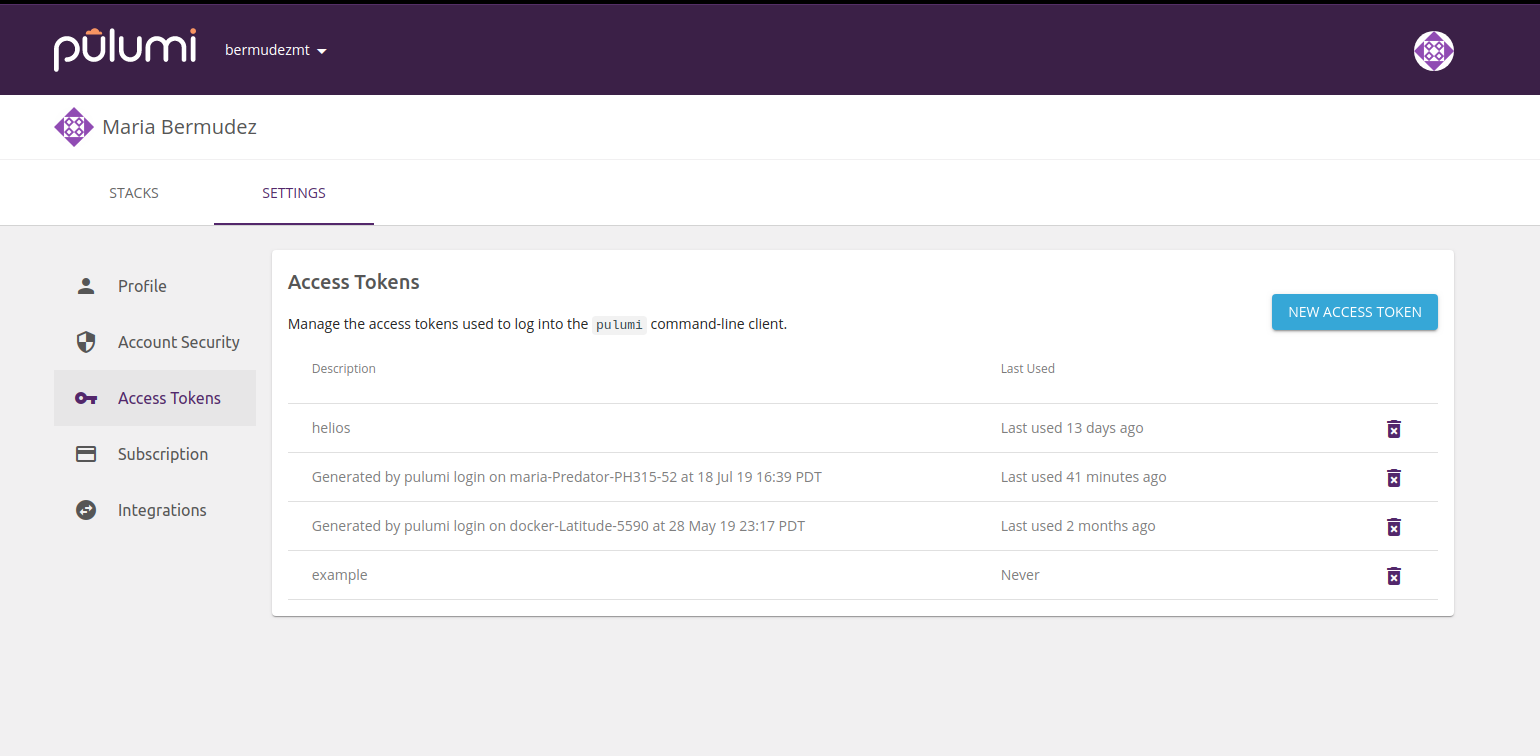
To view your generated tokens, or create a new one, visit app.pulumi.com/account/tokens. The Access Tokens page displays a list of past tokens, when they were last used, and gives you the option to revoke them.
After logging in, state will automatically get persisted with the service. From time to time, you will see a helpful URL to your update or stack pages. You can always go there to see a full history of updates.
To log in to a privately hosted version of Pulumi Enterprise, simply pass its URL to the command:
$ pulumi login https://pulumi.acmecorp.comEverything else works the same, except that Pulumi will target your private
service instead of app.pulumi.com.
To a self-managed backend
The filesystem or cloud storage backend allows you to store state locally on your machine, or remotely with your cloud storage provider. For self-managed backends, state management including backup, sharing, and team access synchronization is entirely up to you. Pulumi built the Pulumi Service backend to solve all of these problems “out of the box”, but we understand that some users prefer to have more control.
Filesystem or local
To use the filesystem backend instead, simply pass the --local flag when
logging in:
$ pulumi login --localYou should see Logged into <my-machine> as <my-user> (file://~) as a result
where <my-machine> and <my-user> are your configured machine and user names
respectively. This stores all stack checkpoints as JSON files to/home/.pulumi
directory on your machine.
To control where these checkpoints get stored, you may specify
a file://<path> URL instead, where <path> is the full path to the target
directory where checkpoint files will get stored. For instance, to store
state underneath /app/data/.pulumi/ instead, you can run this command:
$ pulumi login file:///app/dataNote: If you use a relative path (e.g.
file://./einstein), Pulumi will always make it relative to the current working directory.
Notice that pulumi login --local is simply syntactic sugar for pulumi login
file://~.
Cloud storage or remote
To use a remote backend instead with your preferred cloud storage provider,
simply pass the --cloud-url or -c flag and your storage bucket or blob URL
when logging in:
$ pulumi login --cloud-url s3://my-pulumi-state-bucketYou should see Logged into <my-machine> as <my-user>
(s3://my-pulumi-state-bucket) where <my-machine> and <my-user> are your
configured machine and user names respectively.
In the previous example, we passed an AWS S3 bucket URL, but you can also use Google Cloud or Azure Blob storage.
Amazon S3
pulumi login --cloud-url s3://my-pulumi-state-bucket
Google Cloud Storage
pulumi login --cloud-url gs://my-pulumi-state-bucket
Azure Blob Storage
pulumi login --cloud-url azblob://my-pulumi-state-bucket
This stores all stack checkpoints as JSON files to the .pulumi directory of
your specified cloud URL.
To control where these checkpoints get stored, refer to your cloud storage provider’s documentation. See Self-managed backend for quick links to Amazon, Google, and Microsoft Azure’s storage service quickstarts.
You may omit --cloud-url or -c when logging in to a remote backend and just
use pulumi login s3://my-pulumi-state-bucket.
The precise JSON format these checkpoint files use is not documented, but is
defined in the APIType source code if you’d like to
understand their contents. Note that this is the same JSON format used by the
pulumi stack export and pulumi stack import commands.
Notes on self-managed backends
If you lose the checkpoint for your stack, Pulumi will be unable to manage any
existing resources. Additionally, since Pulumi thinks your stack is empty,
Pulumi will attempt to recreate all of the resources in your stack the next
time you run pulumi up.
Some commands may behave slightly differently when using the local or remote
storage endpoint. For example, when connected to pulumi.com, pulumi up
ensures there are no other updates in flight for a given stack. This doesn’t
happen with self-managed backends. Pulumi also manages secrets using a key
encrypted with a passphrase and stored in Pulumi.<stack-name>.yaml. This
requires you enter the passphrase when you preview, update, or delete
your stack. If you want to collaborate with another person, you’ll need to
share this passphrase with them as well. All of these overhead tasks will have
to be managed separately when you opt into the local or remote state backend.
Going back to the Pulumi Service backend
If you are currently using a self-managed backend, but would now prefer to
simplify things, just run pulumi logout and then pulumi login, and you’ll be back to
using app.pulumi.com.
If you’d like to migrate your stacks from a self-managed backend to the Pulumi Service backend, you can follow the steps below. Suppose the stack “my-app-production” has been managed with a self-managed backend, and you want to migrate it to the Pulumi Service. Run the following commands if you are already logged in to the local endpoint:
# switch to the stack we want to export
$ pulumi stack select my-app-production
# export the stack's checkpoint to a local file
$ pulumi stack export --show-secrets --file my-app-production.checkpoint.json
$ pulumi logout
$ pulumi login
# create a new stack with the same name on pulumi.com
$ pulumi stack init my-app-production
# import the new existing checkpoint into pulumi.com
$ pulumi stack import --file my-app-production.checkpoint.jsonNote:: After migration, your stack’s state will be managed by the the Pulumi Service backend, but the stack will continue using the same secrets provider. You can seperately change the secrets provider for your stack if needed.
Secrets Encryption
When a secret value is provided via secret configuration—either by passing
--secret to pulumi config set, or by creating one inside your program via
pulumi.secret (JavaScript) or Output.secret (Python)—the value is
encrypted with a key managed by the backend you are connected to. When using
the local or remote backend, this key is derived from a passphrase you set when
creating your stack. When using the Pulumi Service backend, it is handled by
a key managed by the service.
For new stacks managed with the Pulumi Service backend, you may choose to use the
passphrase-based key instead. Pass --secrets-provider passphrase when you
create the stack—either via pulumi new or pulumi stack init. You will be
prompted to choose a passphrase which will be required for future operations
like update, preview, and destroy.
When using the filesystem or cloud storage backend, you must use the passphrase-based secrets provider.
Logging out
To delete stored credentials on your machine and log out from your current
backend, run pulumi logout. See pulumi logout
for more details.